
Facebook Lead Ads work for roofing companies, but only when the ad is the beginning of a system, not the whole plan. Native Instant Forms convert significantly better than ads that push traffic to an external landing page, and roofing-specific cost-per-lead typically lands within a range generally considered realistic, depending on your market and creative quality. The channel generates volume. What separates a roofer who books jobs from one who collects junk form fills is what happens in the 5 minutes after a lead arrives.
Three things determine whether your campaign pays for itself:
- A compelling offer — free roof inspection, storm-damage check, or leak triage. Something with a clear reason to act today.
- Speed-to-lead — an SMS or call reaching the homeowner within 5 minutes of form submission. After 30 minutes, contact rates drop sharply.
- CRM connection — every lead lands in a system (JobNimbus, ServiceTitan, or any CRM you already use) so nothing falls through the cracks.
If you have those three in place, or you’re willing to build them today, keep reading. Here’s your 30-minute starting point:
- Confirm your Meta Business Manager account is active and your Facebook Page is connected.
- Install the Meta Pixel on your website (even if your Lead Ads won’t use it immediately, it starts building retargeting data).
- Draft one offer headline and one qualifying question before you open Ads Manager.
- Identify the CRM or spreadsheet where new leads will land.
- Set a test budget of $20–$30 per day for the first two weeks.
Key Takeaways
Facebook Lead Ads generate roofing leads at $15–$75 CPL, but the campaign only becomes profitable when an automated follow-up system converts form fills into booked inspections within minutes.
| Point | Details |
|---|---|
| Speed-to-lead is the highest-leverage variable | Automate an SMS within 60 seconds of every form submission — this single step improves inspection booking rates more than any creative change. |
| Native Instant Forms outperform landing pages | Meta’s Instant Forms convert roughly 3x better than off-platform pages for quick-service offers like free inspections. |
| One qualifier question filters renters efficiently | Adding “Do you own your home?” cuts low-quality leads without significantly hurting form completion rates. |
| Track cost per booked inspection, not just CPL | CPL is a media metric; cost per booked inspection tells you whether the campaign is actually generating revenue. |
| Advantage+ works best with existing conversion data | Use manual radius and homeowner targeting until you have 50+ conversions; then test Advantage+ audiences. |
| Resultsdigitalus builds the full system | The agency handles ads, CRM integration, and lead routing for roofing contractors, with one client per market and no long-term contracts. |
Table of Contents
- How to launch Facebook lead ads for roofing in under an hour
- Campaign structure and settings that actually work for roofers
- Audience recipes for roofers: who to target and how to build the pools
- Ad creative and offers that book inspections for roofing companies
- How to design Instant Forms that balance volume and lead quality
- What to do when a lead arrives: routing, CRM, and follow-up
- How to budget, bid, and measure roofing Lead Ads performance
- A/B testing, learning phase, and scaling without breaking performance
- Meta ad policy and compliance for roofing contractors
- Fixing common campaign problems: low volume, high CPL, junk leads
- What a real roofing campaign looks like: a Results Digital case study
- What most roofers get wrong about Facebook Lead Ads
- Results Digital runs roofing Lead Ads campaigns so you don’t have to figure it out alone
- Sources
How to launch Facebook lead ads for roofing in under an hour
This is the minimum viable setup. You’re not optimizing yet. You’re getting live data.
Step 1 — Create your campaign (5 minutes)
Open Meta Ads Manager. Click “Create,” select the Leads objective, and name the campaign something you’ll recognize in 30 days (“Roofing Inspections — [City] — Test 1”). Leave Campaign Budget Optimization off for now.
Step 2 — Build your ad set (10 minutes)
- Set a daily budget of $25–$35.
- Choose your location: a 15–25 mile radius around your primary service area.
- Age: 30–65. Homeownership skews older; 18–29 rarely own the roof they’re calling about.
- Add interest signals: “Homeowners,” “Home improvement,” “Home repair.” These are proxies, not guarantees, but they tighten the pool.
- Placement: select Advantage+ Placements and let Meta optimize across Facebook Feed, Instagram Feed, and Reels. You can narrow later once you see where conversions come from.
Step 3 — Create your Instant Form (10 minutes)
Your minimum viable form:
- Headline: “Get Your Free Roof Inspection — No Obligation”
- Pre-filled fields: First name, last name, phone number, email (Meta auto-fills these from the user’s profile)
- One qualifier: “Do you own your home?” (Yes / No / Renting)
- Privacy policy link: Required. Link to your website’s privacy page.
- Thank-you screen: “We’ll call you within the hour to schedule your free inspection.”
Step 4 — Write your ad (10 minutes)
Primary text (keep it under 125 characters for mobile): “Hail damage? Leaks? Get a FREE roof inspection from [Company Name] — licensed, local, no pressure.”
Use a real before-and-after photo from a recent job. If you don’t have one yet, a photo of your crew on a roof beats any stock image.
Step 5 — Set up lead routing (10–15 minutes)
- Connect your form to your CRM using LeadsBridge or Zapier. Both have pre-built Meta Lead Ads integrations.
- If you’re not ready for a CRM, set up an email notification in Ads Manager (Instant Form settings → “Email notifications”) so leads hit your inbox immediately.
- Set a phone reminder or calendar block to call every new lead within 5 minutes during business hours.
Go live. You now have real data to work with — or consider expert lead generation in Alberta to accelerate your roofing campaign outcomes.
Campaign structure and settings that actually work for roofers
Objectives, hierarchy, and the Advantage+ decision
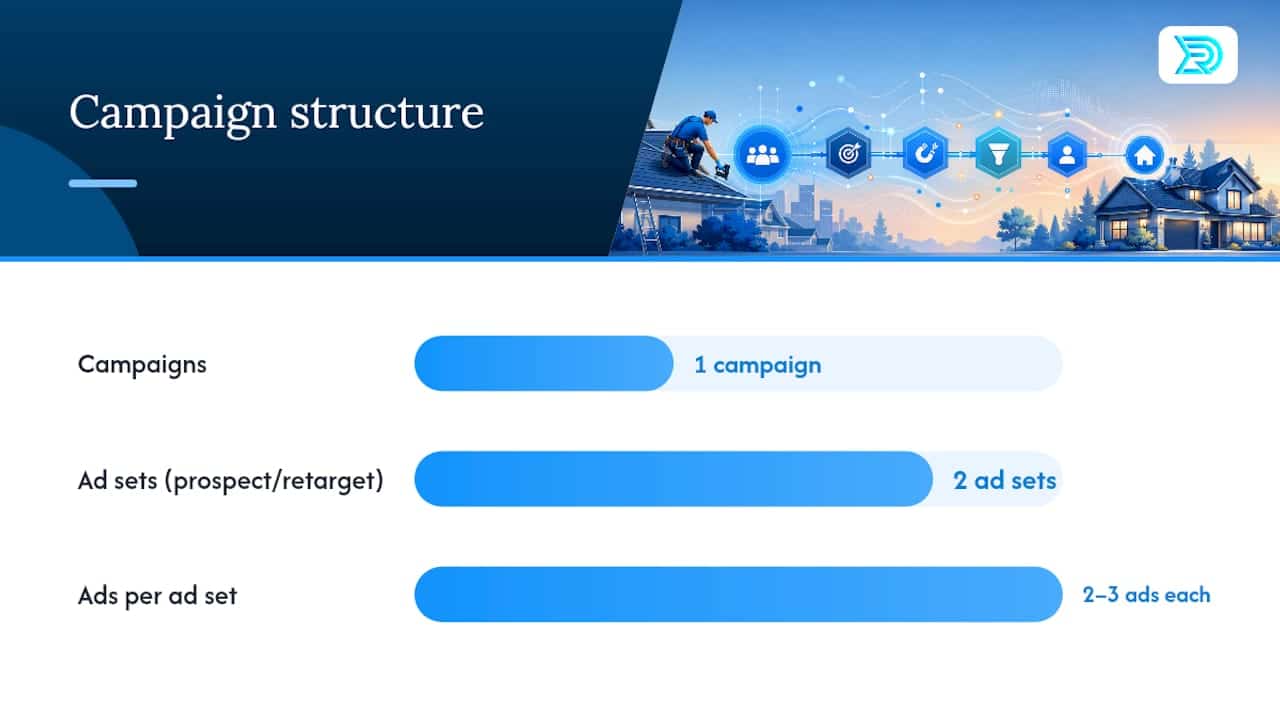
The campaign hierarchy in Meta Ads Manager follows three levels: campaign, ad set, and ad. For roofing Lead Ads, keep it simple at first: one campaign, two ad sets (one prospecting, one retargeting), and two to three ads per ad set. More complexity before you have data is just more noise.
Leads objective vs. Conversions objective: For most roofing companies, the Leads objective is the right starting point. It optimizes for form completions inside Meta’s platform, which keeps friction low and CPL manageable. The Conversions objective makes sense if you’re driving traffic to a landing page and tracking a “thank you” page event with the Meta Pixel, but that setup takes longer to build and requires more traffic volume to exit the learning phase. Start with Leads, then test Conversions once you’re spending $50+ per day consistently.
When to use Advantage+ audiences vs. manual targeting:
| Scenario | Recommended Approach | Reason |
|---|---|---|
| New account, no pixel data, under $50/day | Manual targeting (radius + homeowner filters) | Advantage+ needs signal data to perform; without it, spend goes broad |
| Existing account, 50+ conversions in 30 days | Advantage+ audiences | Meta’s AI finds patterns you can’t manually replicate |
| Storm-response campaign (48-hour window) | Manual targeting with tight radius | Speed matters more than optimization; Advantage+ needs time to learn |
| Scaling a proven ad set above $30/day | Advantage+ creative + manual audience | Lets AI test creative variants while you control who sees them |
A layered funnel approach — prospecting, retargeting, proof-building, and storm-response as separate campaigns — consistently outperforms a single boosted post or one catch-all campaign.
Placements and budget split: Advantage+ Placements is the default and generally performs well for roofing. If you want manual control, prioritize Facebook Feed (highest intent for home services), Instagram Feed, and Reels (lowest CPL for awareness). Stories tend to underperform for roofing unless your creative is vertical-native. For a $50/day budget, put 70% toward prospecting and 30% toward retargeting.
Creative mix: Run at least one static image ad and one short video (15–30 seconds) per ad set. Carousels work well for showcasing multiple jobs or a before/after sequence. Don’t run all three formats simultaneously on a small budget; you’ll split the signal and slow down the learning phase.
Audience recipes for roofers: who to target and how to build the pools
Prospecting audiences
The goal here is homeowners within your service radius who are likely to need roofing work. You’re not looking for intent signals the way Google Search delivers them. You’re interrupting someone’s scroll and making them realize they have a problem worth solving.
Recipe 1 — Tight radius + homeowner proxy:
- Location: 15–20 mile radius around your shop or primary service zip codes
- Age: 35–65
- Interests: “Home improvement,” “Home repair,” “Homeowners insurance,” “DIY home improvement”
- Household income: Top 25–50% (available under “Detailed Targeting → Demographics → Financial → Income”)
- Expected audience size: 50,000–200,000 depending on market density. Under 50,000 is too narrow for Meta’s algorithm to learn efficiently; over 500,000 and you’re paying for people 40 miles away.
Recipe 2 — Lookalike from customer list:
Upload a CSV of your past customers (name, email, phone) to Meta’s Custom Audiences tool. Build a 1% Lookalike Audience from that list.
Recipe 3 — Storm-response activation:
When NOAA storm tracking data shows a hail or wind event in your area, activate a campaign within 48 hours targeting a tight 10–15 mile radius around the affected zip codes. Weather-triggered campaigns can produce high-volume leads at the lower end of the CPL range because urgency is built in. Keep the creative simple: “Hail hit [City] last night. Get a free damage inspection before your insurance deadline.”
Retargeting pools
Retargeting is where your cost-per-booked-inspection drops significantly. These people already know you exist.
- Video viewers (25%+ of a recent ad): Warm audience. They watched but didn’t act. Hit them with a testimonial or a limited-time offer.
- Instant Form openers (didn’t submit): Hot audience. They clicked, started filling out the form, and stopped. A simpler form or a different offer often converts them.
- Website visitors (Meta Pixel required): Anyone who visited your site in the last 30–60 days. Pair with a retargeting ad that references what they were looking at (“Still thinking about that roof inspection?”).
- Existing customer list: Exclude these from prospecting campaigns to avoid wasting spend. Upload as a Custom Audience and use as an exclusion.
Pro Tip: Always exclude your existing customer list and current leads from prospecting ad sets. It sounds obvious, but most roofing campaigns skip this step and spend real money showing ads to people who already signed a contract.
Ad creative and offers that book inspections for roofing companies
The offer is the campaign. Everything else, targeting, creative, budget, is just delivery. Tight geography, homeowner-focused targeting, free inspection offers, and local proof creative are the four elements that appear in every high-performing roofing campaign.
Offers that work
Free roof inspection is the workhorse offer. It’s low-commitment for the homeowner and gives your sales team a foot in the door. Use it year-round.
Storm-damage check works best in the 48–72 hours after a weather event. Add urgency: “Insurance claims must be filed within [X] days of the event.”
Leak triage targets homeowners who already know they have a problem. Higher intent, often faster close. Headline: “Leaking roof? We’ll find the source — free, same week.”
Financing mention can lift response rates, but check Meta’s ad policies and your state’s contractor licensing rules before including specific terms. “0% financing available” is generally fine; specific APR claims require more care.
Creative templates
Static image ad:
- Headline: “Free Roof Inspection for [City] Homeowners”
- Primary text: “Storm season is here. Don’t wait for a small leak to become a big repair. [Company Name] offers free inspections — licensed, insured, no pressure.”
- Image: A real before/after split of a recent job, or a crew photo on a local roof. Before-and-after photos and local proof consistently outperform stock imagery for roofing ads.
- CTA button: “Get Quote” or “Learn More” (both work; test them)
Short video (15–30 seconds):
- Open with the problem (damaged shingles, water stain on ceiling) — 3 seconds
- Show your crew arriving and inspecting — 5 seconds
- Show the finished roof or a happy homeowner — 5 seconds
- Text overlay: “Free inspection. No obligation. Call us today.” — 5 seconds
- End card with your logo, phone number, and service area — 5 seconds
Carousel ad (3 panels):
- Panel 1: Before photo + “Is your roof hiding damage?”
- Panel 2: During/crew photo + “We find it fast — free inspection”
- Panel 3: After photo + “Book yours today — [City] homeowners only”
Image and video specs
- Static image: 1080 x 1080 px (square) or 1200 x 628 px (landscape). Keep text under 20% of the image area.
- Video: 1080 x 1080 px or 9:16 vertical for Reels. MP4 format. Under 30 seconds for best completion rates.
- Captions: Always add captions to video. Most users browse Facebook with sound off, so silent viewing is the default.
How to design Instant Forms that balance volume and lead quality
The form is where most roofing campaigns quietly bleed money. Too many fields and your CPL spikes because fewer people complete it. Too few and you’re calling homeowners who rent apartments.
Field tradeoff guide
| Field | Impact on Conversion | Recommendation |
|---|---|---|
| Name (pre-filled) | Minimal drop | Always include — Meta auto-fills |
| Phone (pre-filled) | Minimal drop | Always include — critical for follow-up |
| Email (pre-filled) | Minimal drop | Always include — needed for nurture |
| “Do you own your home?” | ~10–15% drop | Include — filters renters efficiently |
| “What’s your roof issue?” (dropdown) | ~15–20% drop | Include when lead quality is a problem |
| “When are you looking to repair?” (dropdown) | ~20–25% drop | Use only if you’re overwhelmed with low-intent leads |
| Street address | ~30–40% drop | Avoid unless your business model requires it |
Instant Form template
Form type: Choose “Higher Intent” in Meta’s form settings. This adds a review step where the user confirms their information before submitting.
Intro section: “Get your free roof inspection from [Company Name] — licensed, local, and no-pressure. We’ll call you within the hour to schedule.”
Questions:
- Pre-filled: First name, last name, phone, email
- Qualifier: “Do you own your home?” — Yes / No / I rent
- Optional qualifier: “What best describes your roof concern?” — Storm damage / Leak / Age/wear / Just want an inspection / Other
Thank-you screen: “You’re all set! A member of our team will call you within 60 minutes during business hours. We look forward to helping you.”
Privacy and consent checklist
- Link to your website’s privacy policy on every form. Meta requires this.
- If you plan to send SMS messages, add explicit SMS consent language: “By submitting this form, you agree to receive text messages from [Company Name]. Reply STOP to opt out.”
- If you’re using email nurture, include email consent language separately from SMS.
- Do not pre-check consent boxes. The homeowner must actively opt in.
- Store consent records in your CRM with a timestamp. This matters if a lead ever disputes contact.
What to do when a lead arrives: routing, CRM, and follow-up
The single highest-leverage change in any roofing ad campaign is automating immediate lead routing. The ad gets the lead. Speed wins the job.

Integration options
LeadsBridge is the most direct Meta-native connector. It syncs Instant Form submissions to your CRM in near real-time with no coding required. It supports JobNimbus, ServiceTitan, HubSpot, and dozens of other platforms. Pricing starts at a few hundred dollars per month depending on lead volume.
Zapier is more flexible and works with virtually any CRM or notification tool. A basic Zap: Meta Lead Ads → SMS notification to your sales rep → row added to Google Sheets or your CRM. Setup takes 20–30 minutes. Zapier’s free tier handles low-volume testing; paid plans start around $20/month.
Native integrations: Meta has direct CRM integrations with some platforms (Salesforce, HubSpot) accessible through the Leads Center in Business Manager. Check whether your CRM is listed before paying for a third-party connector.
SLAs that actually matter
- SMS within 30–60 seconds: Automated. This is not a human task. Use Zapier or LeadsBridge to trigger an automated text the moment the form submits. Something like: “Hi [First Name], this is [Rep Name] from [Company]. We got your inspection request — we’ll call you in the next few minutes!”
- Call within 5 minutes: Human task. Assign a dedicated person during business hours. After-hours leads get an automated SMS and a call first thing the next morning.
- Second attempt within 2 hours if the first call goes unanswered.
- Morning follow-up call the next business day for any lead that didn’t connect.
3-touch nurture sequence
- Immediately (0–2 minutes): Automated SMS confirmation with your company name, what they requested, and when to expect a call.
- 5 minutes: Live call from your sales rep or office. Goal: schedule the inspection. If no answer, leave a voicemail and send a follow-up SMS: “Hey [First Name], I just tried calling about your free inspection. I’ll try again in a couple hours — or call us back at [number].”
- Next morning (8–9 AM): Final follow-up call + SMS: “Good morning [First Name]! Still happy to get that free inspection on the calendar for you this week. Give us a call at [number] or just reply here.”
After three touches with no response, move the lead to a monthly email nurture list. Don’t burn your sales team’s time on cold leads, but don’t delete them either. Roofing decisions often take weeks.
How to budget, bid, and measure roofing Lead Ads performance
The CPL math every roofer needs
Start with what a signed job is worth to you. Most roofing campaigns produce leads at $15–$75, which means the math works even at modest close rates.
Break-even formula:
Max CPL = (Average job value × Net margin %) × Lead-to-job conversion rate
At a $40 CPL, you’re generating $230 in profit per lead on average.
Sample budget timeline
| Month | Daily Budget | Focus | Expected Outcome |
|---|---|---|---|
| Month 1 | $25–$35/day | Test 2 offers, 2 creatives, 1 audience | 15–40 leads; identify best-performing combination |
| Month 2 | $50–$75/day | Scale winning ad set; add retargeting | 40 leads; lower CPL as retargeting kicks in |
| Month 3 | $50+/day | Advantage+ audiences; add lookalike | 40 leads; optimize toward cost per booked inspection |
KPIs to track (not vanity metrics)
- Cost per lead (CPL): Your primary efficiency metric. Target $15–$75 for roofing.
- Lead-to-inspection rate: What percentage of leads actually schedule an inspection? Under 30% usually signals a follow-up problem, not an ad problem.
- Cost per booked inspection: CPL ÷ lead-to-inspection rate. This is the number that connects ad spend to real business activity.
- Cost per signed job: The downstream metric that tells you whether the campaign is actually profitable.
- Click-through rate (CTR): A CTR below 0.5% on Feed placements usually means the creative or offer needs work.
- Lead response time: Track this in your CRM. Industry data consistently shows that contact rates drop sharply after the first 5 minutes.
A/B testing, learning phase, and scaling without breaking performance
What to test and when
Run one variable at a time. Testing two things simultaneously makes it impossible to know what moved the needle.
Month 1 test plan:
- Offer test: Free inspection vs. storm-damage check. Same creative, same audience, different headline and form intro. Run for 7–10 days or until each variant has 20+ leads.
- Creative test: Static image vs. short video. Same offer, same audience. Run simultaneously.
- Form test: Standard intent vs. Higher Intent form. Same ad, split traffic between two forms.
Month 2 test plan:
- Audience test: Manual homeowner targeting vs. Advantage+ audiences. Same creative and offer.
- Qualifier test: One qualifier question vs. two qualifier questions. Track CPL and lead-to-inspection rate for each.
Diagnosing learning-phase problems
Meta’s algorithm needs roughly 50 optimization events (form submissions) within a 7-day window to exit the learning phase. If your campaign is stuck in “Learning” after two weeks:
- Budget too low: Under $20/day in a competitive market often can’t generate enough events. Increase to $30–$40/day.
- Audience too small: Under 50,000 people limits delivery. Widen the radius or loosen demographic filters.
- Too many ad sets: Each ad set competes for the same budget. Consolidate to one or two ad sets until you exit learning.
- Frequent edits: Every significant change (budget increase over 20%, new creative, audience change) resets the learning phase. Make changes deliberately, not daily.
Safe scaling checklist
- Increase daily budget by no more than 20–30% every 3–5 days. Larger jumps reset the learning phase.
- Before scaling, confirm your lead-to-inspection rate is above 25%. Scaling a broken follow-up system just burns more money.
- Add new ad sets rather than endlessly increasing budget on one. Each new ad set can find new pockets of the audience.
- When CPL starts rising (usually above $60 for roofing), test a new creative before increasing budget further. Creative fatigue is usually the cause.
Pro Tip: Duplicate a winning ad set rather than editing it. The duplicate starts fresh without resetting the original’s learning data. Run both for 5–7 days, then pause the weaker one.
Meta ad policy and compliance for roofing contractors
Most roofing ad disapprovals are avoidable. Here’s what to check before you publish.
Meta policy checklist for contractor ads
- No misleading claims: “Guaranteed lowest price” or “We’ll beat any quote” can trigger a review. Use “competitive pricing” or “free estimate” instead.
- No emergency urgency manipulation: Phrases like “Your roof is failing right now” or “Immediate danger” can be flagged under Meta’s sensationalism policy. Stick to factual urgency: “Storm damage? Get a free inspection this week.”
- Before/after images: Meta restricts before/after images in some health and beauty categories. For roofing, they’re generally fine, but avoid language that implies a medical or safety emergency.
- Financing claims: If you mention financing, don’t include specific APR or payment terms in the ad unless you’re prepared to comply with financial services ad policies. “Financing available” is safer than “0% APR for 18 months.”
- Contractor licensing: Some states require contractors to include their license number in advertising. Check your state’s contractor licensing board requirements.
- Insurance language: Avoid implying you’ll “handle the insurance claim” in a way that could be read as public adjuster activity, which is regulated in most states.
Privacy and consent checklist
- Privacy policy linked on every Instant Form.
- SMS opt-in language present and explicit (not pre-checked).
- Email opt-in separate from SMS opt-in.
- CAN-SPAM compliance for email nurture sequences.
- TCPA compliance for SMS and auto-dialed calls. If you’re using automated calling or texting, consult a compliance attorney before scaling.
Pro Tip: If your ads mention insurance claims, financing, or specific warranties, have a contractor attorney review the ad copy before you scale past $1,000/month in spend. A single complaint to your state licensing board costs more than an hour of legal review.
Fixing common campaign problems: low volume, high CPL, junk leads
Diagnostic flowchart
Problem: Low lead volume (fewer than 1 lead per day at $30/day)
- Is the campaign in the learning phase? Wait 7 days before making changes.
- Is the audience under 50,000? Widen the radius or remove restrictive filters.
- Is the CPM (cost per 1,000 impressions) above $25? The creative isn’t earning attention. Test a new image or video.
- Is the CTR below 0.5%? The offer or headline isn’t compelling. Test a different offer.
Problem: High CPL (above $75)
- Check lead quality first. High CPL with high lead-to-inspection rate may still be profitable.
- Is the audience overlapping with a retargeting campaign? Add exclusions.
- Is the creative more than 3 weeks old? Creative fatigue raises CPL. Refresh the image or video.
- Is the form too long? Remove one qualifier field and retest.
Problem: Junk leads (wrong geography, renters, disconnected numbers)
- Add “Do you own your home?” as a qualifier if you haven’t already.
- Switch to “Higher Intent” form type in Meta’s form settings.
- Tighten the radius. A 30-mile radius in a dense metro pulls in people 2 cities away.
- Add age minimum of 35. Homeownership rates are significantly lower under 35.
Problem: Disapproved ads
- Read the disapproval reason in Ads Manager. Most disapprovals cite a specific policy.
- Edit the flagged copy (usually a headline or primary text phrase) and resubmit.
- If the disapproval seems incorrect, use the “Request Review” button in Ads Manager. Human reviewers often overturn automated decisions.
- If an account gets multiple disapprovals, avoid making rapid changes. Each edit triggers a new review.
Quick fixes by issue:
- Low volume → widen audience, increase budget 20%, test new creative
- High CPL → refresh creative, add exclusions, simplify form
- Junk leads → add qualifier, switch to Higher Intent form, tighten radius
- Disapproved ad → edit flagged copy, resubmit, request human review if needed
What a real roofing campaign looks like: a Results Digital case study
A roofing contractor in a mid-size Sun Belt market came to Resultsdigitalus running boosted posts with no lead routing. Leads were going to a Facebook inbox that nobody checked consistently. CPL was untracked. Jobs were being attributed to “word of mouth” even when the homeowner had clicked a Facebook ad three weeks earlier.
Here’s what changed operationally:
- Switched from boosted posts to a proper Leads campaign with the Leads objective, a dedicated Instant Form, and a service area radius reflecting the company’s reach.
- Added a LeadsBridge integration connecting the Instant Form directly to JobNimbus so new leads created contact records automatically.
- Built a Zapier workflow that sent automated SMS to leads promptly and notified the sales rep immediately.
- Replaced stock imagery with before/after photos from recent jobs and a short video of the owner walking a completed roof.
- Added one qualifier question: “Do you own your home?” This significantly reduced renter leads.
Results over 90 days:
- CPL dropped substantially to a consistent range considered profitable.
- Lead-to-inspection rate improved notably after implementing the automated SMS and prompt call protocol.
- Cost per booked inspection fell within a profitable range for their average job value.
The biggest unlock wasn’t the ad. It was the 60-second SMS. Homeowners who filled out a form at 7 PM got a text before they closed the app. By the time a competitor called the next morning, this client had already scheduled the inspection.
Reproducible checklist from this campaign:
- Tag every lead source in your CRM from day one.
- Automate the first SMS. Don’t rely on a human to send it.
- Use real job photos. One before/after image outperformed three stock images in A/B testing.
- Add one qualifier question. Not three. One.
- Track cost per booked inspection, not just CPL.
What most roofers get wrong about Facebook Lead Ads
The conventional wisdom says the ad is the hard part. Write better copy, use a stronger image, nail the targeting. That’s where most roofing companies spend their energy, and most of their budget.
The data tells a different story. Most roofing ad spend is wasted not because the ad failed but because the lead response was slow. A homeowner who fills out a form at 6:45 PM on a Tuesday is in a decision window that closes fast. They may have filled out two other forms the same evening. The roofer who calls first, not the one with the best ad, tends to book the inspection.
That reframe changes where you should invest your first hour. Before you spend a single dollar on creative testing or audience refinement, build the follow-up system. Automated SMS, a clear call protocol, and a CRM that logs every touch. Then run the ads. The multi-layer funnel approach — prospecting, retargeting, proof-building, storm-response — matters, but it matters most when the foundation is solid.
One more thing most guides skip: Facebook Lead Ads and Google Ads for roofing are not competitors for your budget. They serve different moments. Google captures homeowners who are already searching for a roofer. Facebook interrupts homeowners who don’t know yet that they need one. Run both when budget allows, feed both into the same CRM, and you’ll see which channel produces the faster close. In most markets, Google leads close faster; Facebook leads close cheaper. Both belong in a mature roofing marketing strategy.
Results Digital runs roofing Lead Ads campaigns so you don’t have to figure it out alone
Resultsdigitalus is a veteran-owned digital marketing agency built exclusively for roofing contractors, and Facebook and Instagram Ads for roofers are a core part of what the agency delivers. The difference from a generalist agency: every campaign is built around booked inspections and signed jobs, not impressions or clicks.
The agency handles campaign architecture, Instant Form design, LeadsBridge or Zapier integration, creative production, and ongoing optimization. No long-term contracts. One roofing client per market, so your campaigns never compete against another client the agency manages. Three questions worth asking any agency before you sign:
- Do you work with other roofing companies in my market?
- How do you track cost per booked inspection, not just cost per lead?
- What does your lead-routing setup look like on day one?
Resultsdigitalus answers all three clearly. If you’re ready to run a connected Lead Ads system that actually books jobs, book a strategy call and see whether your market is still available.
